Friday 29 May 2015

Chevrons for Kel

My friend Kelly has been super generous with baby stuff since I had my daughter, so I wanted to thank her with a custom made 'something'. She had chosen the material a while back with the request for a dress, but alas - we realised too late we didn't have enough material, and that pattern was no longer available. So today was D-day, and Kel decided on a top and dress for her daughter. My first time making something from 'virgin' material for someone else so many, many, many tryings-on later, voila! (Isn't my model gorgeous?!)


What I learned:
  • matching up chevrons on the seam is a 'mare - and totally not worth it
  • creative darts can get rid of bulk where bulk should not be 
  • Kelly has a nice bum, worth showing off!


Romper to Top

When the little' un came along, chums were very generous with gifts of clothing. I know my friend, Claire, had been awaiting the arrival so she could pass on her funky fashion and this was one of the first things my daughter wore. (Claire told me lemons were very much 'on trend' - as if I didn't know...ahem...)
My little girl wasn't born so big, but she soon outgrew this 0-3 month piece and it's been on a teddy in her room ever since; no longer were we able to fasten it around her ever-chunkier thighs. Well, nothing - not even sentimental items - are safe from my upcycling fever so after making sure it still fitted everywhere else, I carefully cut around the bottom edge and sewed in some double-layered 5rm Daiso cotton lace ($1 - actually 0.50 cents as I only used half the packet). The result - a top she can wear for at least a couple more months. I only wish I'd thought of it earlier as she's now over 9 months. Anyway, it's a win - thanks Claire!

What I learned:
  • Baby rompers from Gap are wholly lined
  • I can extend the life of clothes for my little girl with lots of romper upcycling
  • Hold on to the placket of snap closures for future projects (as they are such a pain to attach individually)
  • Remembering to 'true' the cut a little round to reflect the cylindrical body  gives a much better finish than a 'straight across' cut


Wednesday 27 May 2015

I Followed a Pattern!

My sewing adventures so far have been a bit of hit, a lot of miss and rarely following the instructions. So, I am particularly pleased that I have finally managed to follow a pattern to the letter, with some great results. I'd had this crossover dress from Smashed Peas and Carrots on my Pinterest board for a while, so yesterday I decided it was time to tackle it (much motivated by my desire to keep my daughter out of grossly over-flowered and over-pink outfits).
Staying true to my upcycling commitment, the blue side was a 1rm (15p / 20c) sleeveless blouse from a 'bundle' shop in KL, and the spotty side was one of my baby's receiving blankets.

Although it's a bit big yet, I couldn't resist trying it on her and I'm really please with how it turned out. Usually when I go to try things on her, I realise the armholes are too tight or she can't get her head through so this was a definite win. Next challenge: diaper bloomers to match!

What I learnt:
  • receiving blankets have way more material in them than you'd think
  • sometimes unpicking hems and seams is really worth the time it takes (for that extra inch of material) on items to be upcycled
  • covering buttons with material is easy with Daiso's 5rm packs of 24
  • pressing seams can make a project go from beginner to brilliant


Saturday 9 May 2015

Beach 'thing' to summer top

I knew it had been a while since I posted, but I didn't realise it was as far back as January that I last shared my sewing stories. I'll get round to filling the gap soon, but in the meantime, today's success...

This upcycle was inspired by Carissa, but the material of my item was plain, light cotton rather than stretchy stuff, so I could tell pretty quickly her tutorial wouldn't work for me (though I'm grateful for the inspiration). Time to get creative.


First I took the top/skirt thing I've had in my drawers for ages. It cost £1 in Primark many years ago and has never seen the light of day as it was too loose on the bust to stay up and too hot to wear with that shirring anyway. (I don't know why I continue to be seduced by shirred tops, as I never wear them.)


I started by cutting off the shirred part and hemming the top. I hemmed it by turning it over twice as I'd made a hash of it with the pinking shears.

With that done I measured around my bust and took in the resulting rectangle on both sides. This then left me with matching material to do the straps.

Next step was to pull in the material at the back using a technique from my sewing teacher. It's kinda hard to describe but maybe you can see from the picture. (Although it's shown - upside down - with the straps sewn on, I didn't attach these until after making sure it was the right width and I could get it over my head.)
This little trick gave it a bit more shape at the back as well as ensuring it was the right fit around my body.

Next, I attached the straps and that was pretty much it. Voila!

What I learned:
  • When attaching straps, do so as close the the edge as possible to avoid that 'turned out' effect when you wear it.
  • Don't try to use pinking shears to separate shirred material - it just gets tangled.
  • Measure everything and press seams before sewing.
  • Try everything on every time you make an adjustment before sewing.

Saturday 17 January 2015

Doctor Who costume

From the minute my 6-year-old learned what a sewing machine could do, he's been asking for a 'David Tennant' suit. My husband clarified that he meant Dr Who but when I looked up Google Images, I thought, 'Not in this lifetime matey!' - way too complicated for a beginner like me.
In the meantime, a good old rummage through the mountain of clothing in Sharin's Bundle Shop, I unearthed this groovy pin-stripey dress.

I wasn't entirely sure what I'd do with it but the fact it was cotton and 1rm (about 20p in the UK or 30 cents in the US) was enough to convince me; it's nigh on impossible to find anything apart from synthetic clothes in high street shops these days, so I knew I'd put it to good use.
Once washed, it was added the ever-growing pile of material by my machine where my son spotted it and announced it was just what was needed for his David Tennant costume. After some negotiation, he instructed me to make a waistcoat which then led to him eyeing up the remaining fabric and asking, 'What about the trousers?' (He doesn't miss a beat.) Only a few swear words later (internally uttered of course) and a bit of old red t-shirt - voila! Something of a David-Tennant-Dr-Who costume that took around an hour.

It's far from perfect, and missing the full-length coat (gimme a break!) but my son's happy and he asked me as I finished off, 'Are all mummies magic?' Yes they are son!

What I learned:

  • keep my fabrics hidden from my children
  • you can't avoid finishing off edges to avoid fraying, even for a costume
  • basic cosplay trousers are easier than even cushion covers
  • old school T-shirts are good for costume 'shirt' collars
  • children's imagination has no limit and their standards are far less exacting than mine

Thursday 15 January 2015

Eating skirts

I'm determined to make my way through my Pinterest board of 'easy peasy sewing' items. That might be somewhat impossible as I am adding to it faster than I'm making, but you gotta have a dream...
This tutorial from 'Make It & Love It' was too tempting given my recent pregnancy and the resulting multitude of maxis now sitting unused in my wardrobe. (What is it about maternity clothes that no matter how much you loved them with a bump, they totally lose their attraction once the baby is out?)
Unusually for me, I followed the instructions and was delighted with the results: so much so I immediately donned it for lunch. This 'eating skirt' is stretchy, comfy and cool - what's not to love?!
After lunch, I was still buzzing so grabbed another skirt and - true to form - decided to 'interpret' the instructions and add in a hidden elastic instead of sewing it on as a waistband. I won't be doing that again in a hurry, mostly because the elastic threading thingy (yes, that's the technical term) kept dropping the elastic meaning I had to undo stitching in the end to get it through. Nonetheless, it came out well and is as wearable as the first one.
Must. Not. Get. Addicted.

What I've learned:
  • this tool is OK for shorter threadings of elastic - like a baby's neckline - but for longer threadings I'll probably do the sewing after pinning the elastic in place
  • sometimes you've just got to learn the hard way

The above sort of looks like the tool I have, but this is probably what I should be using.


Wednesday 14 January 2015

10 minute / 90 minute dress

When I saw this tutorial for a 10-minute dress, I decided it was perfect to lift my mood and give me a 'win' after yesterday's failure of a summer suit (which I will try again as soon as I've finished ironing out what went wrong, with the help of lovely Rae who provided the tutorial). It also liked the idea as one thing I hate about dresses (apart from the fact they are all pink and flowery) is they tend to ride up and end up all bunched around baby's waist, which must be pretty uncomfortable in this tropical heat. Also, having to take off the matching panties to change a nappy isn't my idea of practical: this dress with a hidden bodysuit sounded like the solution to that.
To be honest, it did not take 10 minutes or anything like it, mostly due to my having to unpick the entire skirt from the bodysuit as it had been sewn on so badly - I'd actually missed huge sections so it was half-attached, half hanging off. In the end, I reckon I spent over an hour on it but it doesn't matter cos it worked!
I had a pack of wee flowers on hand from the amazing Daiso (12 for a quid!) so I sewed a few over the faded logo on the bodysuit and I think it added a nice finishing touch.
Phew!


What I learned:
  • unpicking stitches takes AGES, although there's possibly a better technique I haven't yet discovered
  • shirring isn't half as scary as I thought
  • picking up odds and ends of bargains for embellishments is worthwhile
  • upcycling is very satisfying


Tuesday 13 January 2015

A massive fail of a summer suit

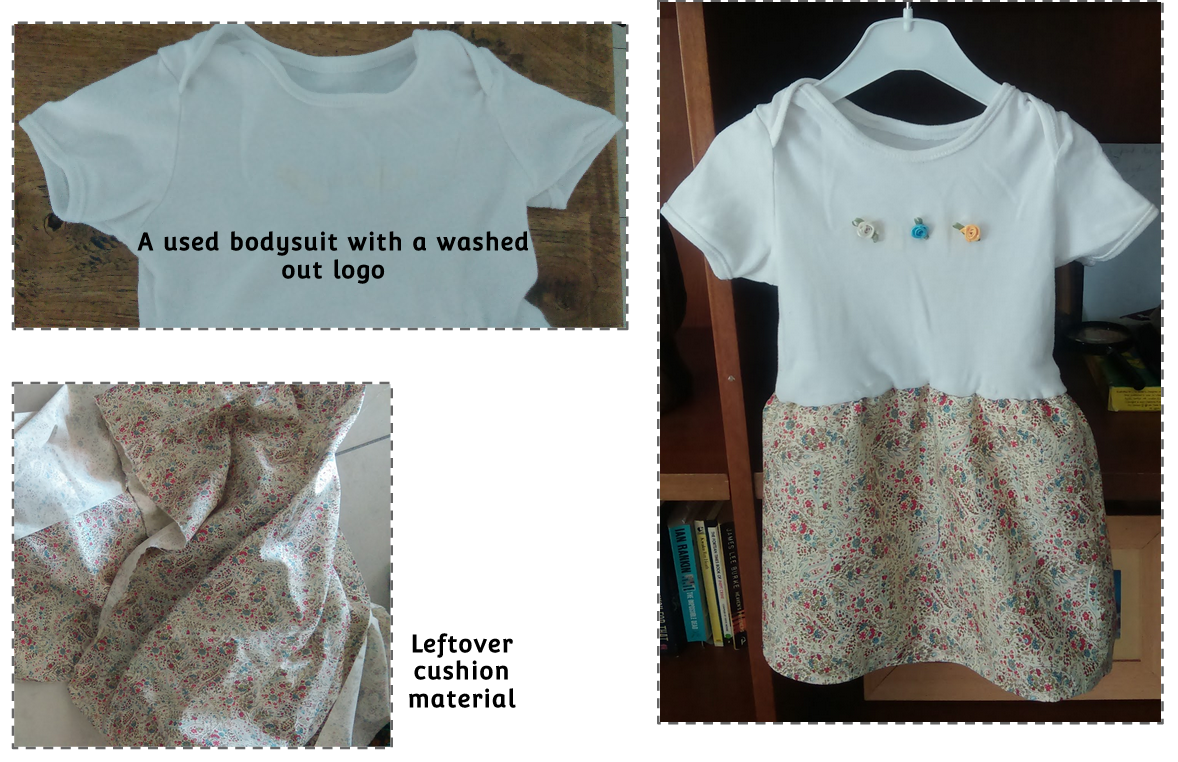
When I came across this tutorial by Rae for making a simple baby summer suit, I thought it the perfect project to practice following instructions. (I'm building up to following an actual pattern I swear...) However, despite my best intentions, I ended up with a very narrow tube that would go nowhere near my chunky 5-month daughter.
Why share my failures? Well, if anyone else is just starting it's good to know you're not the only one for whom it doesn't go according to plan. It's also gonna be useful for me to look back and see my mistakes so I can learn from them.
On the bright side, I did manage to shir along the leg holes using elastic thread without breaking my machine so there's always something to be grateful for I guess. However, I'd spent so long on it - including putting in the snappers - that I really lost heart and just couldn't bear to start again. (Maybe it's something to do with being the 13th.)
I've emailed Rae and she's kindly already replied so we are trying to work out what happened although I'm pretty sure I got the orientation wrong. I won't give up completely I WILL get back to it.
In the meantime, I need to sew on and have some success to keep me going...

What I learned:

  • it's actually really quick to zigzag stitch once you get the hang of it, but I'm still investing in a pair of pinking shears
  • following the instructions does not automatically guarantee success: get over it
  • Rae is really helpful!

Wednesday 7 January 2015

The quick scarf

Not quite sure how I stumbled across it, but I watched the video on this page on using an old t-shirt to create a funky scarf. It's not going to fend off the cold in the UK, but it might just be perfect for defence against excessive aircon in the malls here in Malaysia.
It was super fast, required no sewing and I think the result is pretty good, especially when aforementioned t-shirt was heading for the bin anyway. (Of course when I say 'bin' I mean recycle bin, but I always feel a bit tight putting such crappy stuff in there.)
And if you're looking for some more ways to upcycle old t-shirts, you can check out over 50 ideas on this page.


Tuesday 6 January 2015

First Post

Since I can remember, I've had this unfortunate pairing in my life - my desire to be an expert sewing demon plus the attention span of a gnat. However, I did ask for - and receive - a sewing machine for Christmas so really it's time to get on with it. I've waited long enough for those brain chips to come out, but have now accepted the only way this thing is gonna get done is by learning it myself. (I am not, and doubt I ever will be, averse to fabric glue. I haven't actually tried it yet but it appeals to my find-a-shortcut-wherever-possible nature and I'm thinking felt letters are just too pernickity to sew on...)
So (the pun, the pun!) I've started with a few little projects, and one big one i.e. copying my favourite weird-shaped skirt and inserting a zipper. For the latter, I had on hand the wonder seamstress-turned-yogini Erika but it doesn't detract from the fact that I made it!
I must admit I got a little over-excited at the tons of free patterns and tutorials online and have already promised skirts and dresses to friends, so I'm going to have to knuckle down with a proper pattern and work it all out - eeek! In the pipeline are items from this pinboard - including the Grecian-style dress and a couple of the simple skirts - and this other board is for collecting pseudo-stroke-no-sewing projects.
What I've learned so far:

  • remember to hold the bl**dy threads every time you start sewing, or risk rethreading with every starting row
  • always keep the pincushion and scissors within reach - you will inevitably need them when they are at the other end of the table and you are sitting under a mountain of pinned material
  • ironing before sewing really does make for a straighter finish (I suspect washing fabrics beforehand really is a good idea - possibly essential - but I haven't got the patience to wait for it to go through a cycle and dry so my cot cover and cushions may yet be wonky)
  • I can't stand the idea of following patterns, much less assembling them from 20 pieces of A4 paper
  • teasing out that stuffing stuff that's inside pillows is mega-tedious and takes forever
  • young children - at least from 5 to 8 years of age) think teasing out that stuffing stuff is fun...at least for a while
  • Daiso is amazing (5RM/a quid for 12 filled bobbins that fit my machine!) followed closely by Spotlight sales and eBay for cheap, reliable materials and tools
  • I LOVE sewing!